Friday, September 23, 2011

Hey Goody, Scroo You!


Years ago, I saw a product at a hair show called "Hair Scroos". The idea was a stroke of genius! These hair pins were in the shape of a double helix spring that you screw into, let's say, a bun and they kept the hair in place amazingly well. They cost about fifty cents a piece and I bought a bunch. When they were all gone, the search began for more with no luck.
Miracle of miracles, last year a client told me Goody came out with a version of them called "Spin Pins" I was elated! Off to Walgreens I went to buy these "spin pins" and found they were $6.50 (plus tax) for two pins. Really? That's outrageous! It was time to take matters into my own hands.
After an exhaustive web search, a long hair forum had a tutorial with out of focus pictures, but great ideas. You can make your own for about 10 cents each. Here's what you'll need:

Supplies

Go to Home Depot (or Lowes or Ace) and pick up these items:

*3/8" wooden dowel ($1.18)
* Needle nose pliers ($1.88)
* 16 gauge steel wire ($4.88 for 3.5 lbs or 330 feet)
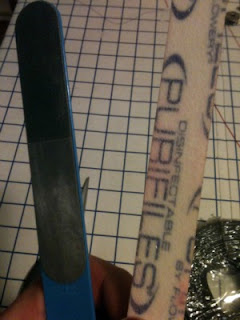
* Coarse and fine grit sandpaper, or nail files from Sally's Beauty Supply ($1.39 for 3 way file)
* Metal safe spray paint in your desired hair color ($0.97 to $6.28)
* I already had a spin pin to use as reference, but you don't need to buy one since the point of this is to make your own
Each pin will cost approximately $0.10 to $0.11 if you don't already have some of these items.
Here are the specifics:

Sorry about the fuzzy!
Prep the Dowel
When you are at the hardware store of your choice, they usually have a work station where you can cut your own wood to size. Use their saw (unless you have your own) and cut a notch in the end of the dowel big enough to hold the wire in place. Cut the dowel to a more workable length. Since the wire is to be cut to 10", that would be a good length so you can use the dowel to measure your wire later.


Mark the dowel at 3/8" intervals starting below the notch on both sides.
Draw from the notch down in a spiral pattern connecting with every other line you marked.
Repeat on the other side.


This wire was $4.88. It's the kind used for re bar. It's packed in bearing grease. Bearing grease is nasty. However, after using alcohol to remove the nasty grease, the rough surface is perfect to spray paint. I have a feeling it's probably a lot less expensive than wire that's not packed in grease.


Cut the Wire
Measure your wire to 10". Make sure your wire is nice and straight. If you cut your dowel to 10", then use it to measure. This is a guideline, not a rule. You can make your pins shorter or longer- knock yourself out. If you want them to be the same length as Goody's, then go with 10". Use the wire cutter on your needle nose pliers for this task.


Smooth the Ends
Now, use your coarse grit sand paper or coarse grit nail file to smooth the ends of the wire. Once they are fairly smooth, use the finer grit to really polish. If you are using nail files, get a buffing file that has several grades of grit. The more smooth the ends are, the less they will pull your hair. You want to do this process before you start bending the wire. Trust me, it's a lot easier.


Start Forming the Spiral
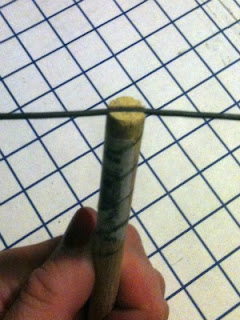
Place the wire in the notch- make sure it is centered.


Push down both sides of the wire as close to the dowel as you can get them. You can use the pliers to clamp the wire down if you put a cloth over it first. If you don't protect the wire, it will be rough and pull your hair. Start twisting the wire down the dowel according to the pattern you have drawn. When you get to the end, use the pliers again to clamp the (protected) wire close to the dowel.
Your new "spin pin" should look like this:


Paint the Pin
So now you have your finished pin, but it's the wrong color. No problem, grab some metal-safe spray paint and remedy that problem. Use what's left of the dowel, and hang your pin or pins from it with string, ribbon or whatever you have handy. I used left-over curling ribbon.


Spray paint about 12" away in a well ventilated area, or even better, outside. Make sure to get all sides, but don't over do it. You don't want drips. Place the free end of the dowel under a book or something weighty on a shelf so the pins can hang free and dry over night.


And here you have it- an inexpensive version of Goody's Spin Pin you made yourself for pennies on the dollar! Not too shabby.


Thanks to Tameriska at The Long Hair Community for posting the original tutorial:

Thursday, September 15, 2011

Diary of a Pompous Ass

A dilemma has been brought to my attention. Evidently, there are too many personal pronouns being used in my blog. The personal pronoun "I" is the primary offender.
This poses a question. How does one not use the word "I" when writing in the first person, thereby sounding like a pompous ass? (See what I did there, referring to myself as "one"? Pretty good, right?)
Here are a few ways to avoid said pronoun:
"It is thought that...." There must be a general consensus somewhere that determines what is thought, because this pops up a lot.
"In my humble opinion..." If you have to say "humble", then you are a pompous ass.
Drop the "I". Instead of "I just tripped over the cat.", say "Just tripped over the cat." Damn cat.
Use "you" when describing a process. "When writing in the first person, you should avoid over-use of the word I." Yeah, that works.
So, the moral of the story is: be aware of personal pronouns when writing a blog. It gets annoying for the reader and makes you sound like a pompous ass. Or an arrogant know-it-all. It is thought, in my humble opinion, that you should avoid that. (See what I did there? Awesome, right?)

Saturday, September 3, 2011

Pimp My Dresser


    And now for an actual tutorial/before and after. This is the whole reason I decided to blog- bragging rights.
    Back in June, my friend Julie and her lovely family bought a their first home. She made a plea on Facebook for help moving. A friend will help you move, but a real friend will help you move a body. Since I had back surgery in April, I didn' fit into either of these categories. However, I let her know if she needed help with anything "Martha Stewart-esque", I was her girl.
    She presented me a challenge- transform a very plain dresser into a piece worthy of the entryway in her new home.

Boring Dresser

We batted some ideas back and forth and settled on a Chinousserie-inspired pattern based on this picture:


Chinese Armoire (found on a website that gave my computer a nasty virus)

After searching the internet and saving countless pictures of Chinese, Japanese, and Asian inspired furniture and pictures, I settled on this beautiful Chinese armiore. I was attracted to the cherry blossom and peony patterns. I printed Julie's dresser picture and used colored pencils to draw the design.


Design on paper

I printed out enlarged copies of the elements in the Chinese armiore photo and used them to construct my template for the drawers. After getting the measurements of the drawers from Julie, I taped together printing paper in the right size to for all four drawers. I then used the printed photos to construct the design with reference to my original drawing.


Template on paper

I cut the paper template according to the height of the drawers and used transfer paper to mark the pattern.

Pattern ready to be painted
Let the painting begin!


In the meantime, while I was painting flowers, Julie was sanding away the old finish on the body of the dresser.....


Naked dresser body (he he!)
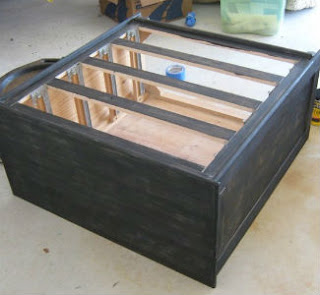
...and painting it black.


First coat

I finished the drawers and painted on two coats of Polycrylic in semi-gloss.

Finished drawers
I fished everything just in time for Julie's housewarming party. I think we made a pretty good team!

VOILA!

    And that is the story of Julie's dresser. I love this kind of stuff because it proves you don't have to spend a lot of money to have nice things. You just need to look at what you have (or have purchased at a garage sale or thrift store) with an eye to creativity. It may take a little time to do a project like this, but in the end you can have something that means more because YOU did it. If you go to Z Gallerie and buy out their showroom, it will look nice, but you've spent a whole lot of money and it will look like you bought it at Z Gallerie. Where's the fun in that?


Friday, September 2, 2011

Wasting Time..... Making an Ugly Blog

   
    I had an idea a few days ago as I toiled away on my hand-made-teardrop-cocktail-hat-birdcage-veil-with-hand-made-flowers-and-sewn-on-beading. I said to myself, " I bet someone out there would like tutorials of my projects!" I know I'm always scouring the internet for tutorials. They are indispensable in my life. I believe if I can find a tutorial for it, then I can make it.
    That's when the idea of my blog was born. I have several friends who blog and I read more blogs than I can keep up with. My interest are wide, so I follow blogs about decor, fashion, storage, organization, cooking, sewing, art and on and on and on. You get the idea. I thought I would throw my hat in the ring. How hard could it be?
    Those are famous last words. Not because posting a blog is hard, but because designing a blog page is much harder than I imagined. More frustrating than hard, actually. I thought I would sign up, pick out a template, pop in a few pictures, followed by witty comments, then Voila! A beautiful blog people would be clamouring to see.
    That's just not how it's working out at the moment. Right now my blog is down right ugly! I've been wasting so much time trying to get the smallest details right, that I have finally just given up, and decided to make this a "work in progress".
    So- in summary, my blog is just not going to look exactly how I want it to for a while. I'm anxious to actually start blogging, so I'm going to do that, despite the look of my blog being sub-par.